 then
then
 and finally
 to open the following window:
In this chapter you will learn how to assign a start position to the feeder drive wheel of each (active) feeder.
This process must be run only once for each active feeder. The offset value will be assigned to each individual feeder. You can teach the offset (automatically or manually) at the machine or (manually) at the prep station. Feeders are pre-adjusted by MIMOT before shipping. You only need to re-teach the offset if the feeder has been mechanically disassembled.
You can teach the feeder offset manually or automatically.
Make sure that Magazine/slot zero points are already teached before you can teach feeder offsets.
Note: Always use the same slot to teach the offset of the drive wheel of an active feeder.
Insert the feeder into slot 1 of the first feeder bank.
Press then
and finally
to open the following window:
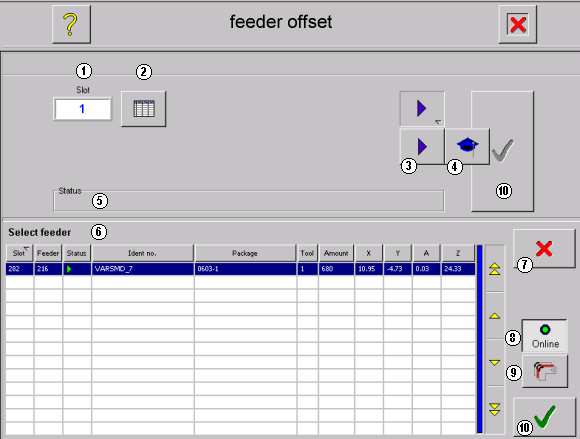
1 - Standard setup is slot 1 in feeder bank 1
2 - Use the selection list to choose any other slot
3 - Step mode
4 - Teach mode
5 - The status display indicates whether the feeder bank has been measured before
6 - Feeder selection list shows the slot usage
7 - Cancel
8 - Set the feeder online
9 - Show current mounting status of the feeder
10 - Confirm and proceed
The head camera moves to the coordinates which are saved in AFPPOS.dbf in the "Pick" folder of the database structure (see following screen shot).
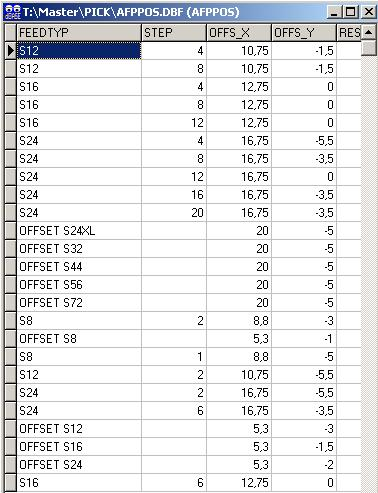
OFFS_X and OFFS_Y represent the pick position, related to the magazine zero point.
With this functin you teach the offset (distance) of the wheel's tooth from the magazine zero point.
The following window is shown:

1 - Selected slot
2 - Status display
3 - Using the microstep button you can adjust all feeders to the same starting position. This function must be run once for all feeders. Teach the center point of the tooth.
4 - Offset in Y direction
5 - Speed of micro stepping
6 - Lighting setting for the head camera
7 - Current feeder number
8 - Set feeder to online state
9 - Test button to perform a 2 mm step
10 - TEst button to perform the number of steps according to the settings of the package library
11 - Confirmation of settings
This function is also available at the prep station.
To run an automatic teaching of the feeder offset, the feeder must be dismantled and inserted into the feeder bank.
To start teaching press then
then
and finally
 .
.
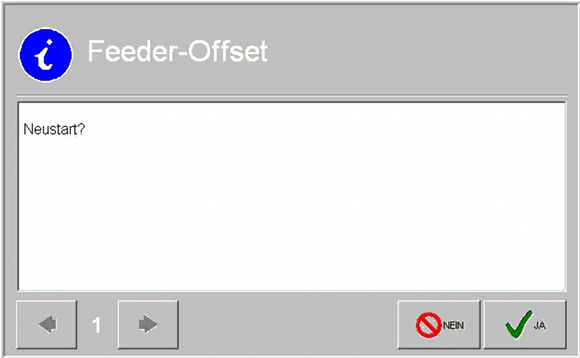
The software will ask, whether slot zero points are already teached. Confirm if YES:

Then the software will ask, whether you want to do a complete restart or continue feeder offset teaching. When you confirm the restart a new logfile will be created. The previous one will be overwritten.
After pressing the start button the machine will measure machine origin and head origin. Then the camera moves to the first inserted feeder.
The vision system searches the index feed pin of the drive wheel. To calculate the offset the drive wheel will perform two revolutions.
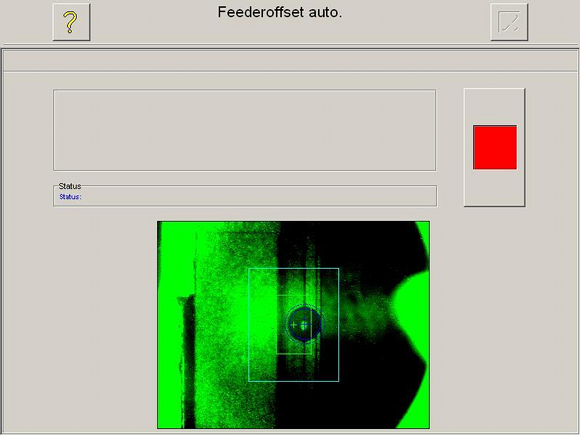
As soon as the feeder offset has been teached the camera will move to the next feeder.
Once the offset of the feeder is calculated, its green and orange LEDs will start flashing.
After completion of the automatic teaching of feeder offsets the system creates a logfile. The results are displayed on the screen and the file is saved in the "Pick" folder of the database (file name: OP+date, e.g. "OP021105.txt").
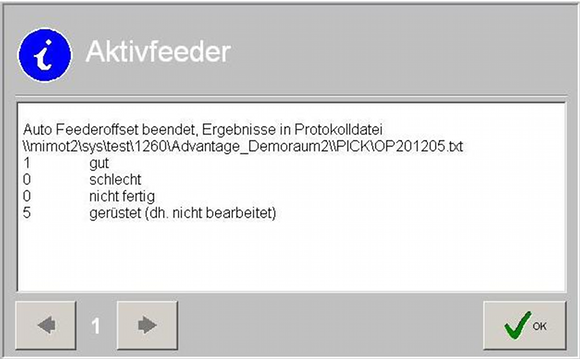
Feeders, where teaching hasn't been successful (bad) must be re-teached.
They are listed in the related file.